

How To Make A Drawing Panoramic
A spherical panorama is one that captures, not just 360° around, only all the style up and down besides. It captures every direction. I want to show yous how y'all can hand draw (or sketch, paint, etc.) these panoramas.
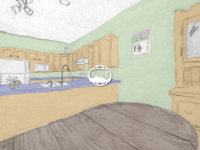
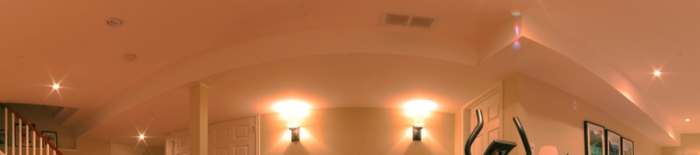
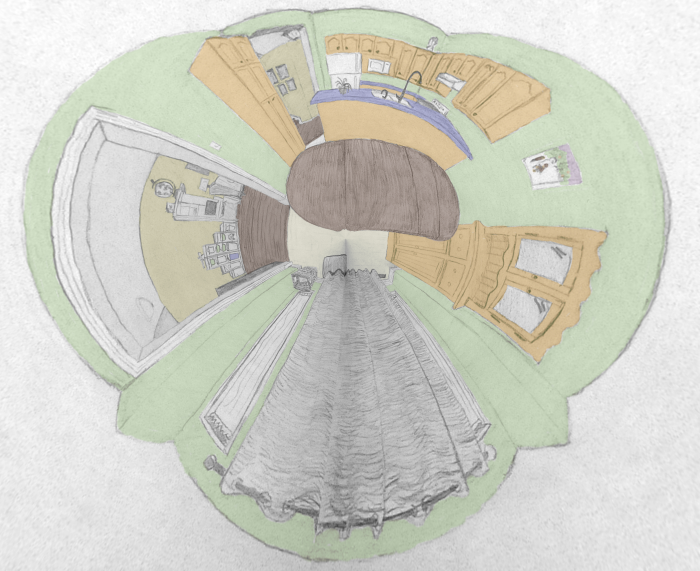
For instance, here's my kitchen.

And if you can draw ane that adheres to the equirectangular projection, you tin can upload it to sites like Flickr and Facebook which provide interactive panorama viewers similar these ones:
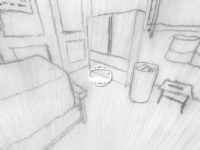
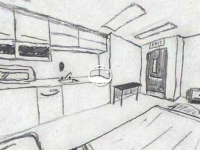

Hand drawn panoramas are an uncommon fine art form but they aren't new. Artists like Dick Termes, Matthew Lopas, Jackie Lima, Arno Hartman, and Tom Lechner have been drawing or painting consummate or ultra-wide-bending panoramas for some time. Matthew Lopas' facebook folio features many such paintings, and Tom Lechner'south flickr grouping has more than examples.
Fun correct? It seems in that location are as many ways to attain hand drawn panoramas as there are artists doing this. I tin can show you how I did mine. Follow along.
Step 0 – Become familiar with equirectangular projections
It is a proficient idea to become familiar with what an equirectangular projection is before you head out to depict one. Skip to step 1 if you are. If non, hither's one now!

An equirectangular project maps your surroundings to a rectangle with 360 equally spaced degrees from the left to right and 180 equally spaced degrees up and down. Have a wait at the equirectangular grouping on Flickr for more than examples. Notice how the the left side wraps around and continues on the right. Besides notice how the top and bottom get all stretched out.
Permit's do a demonstration. From where yous are sitting now, notice that an edge coming from one corner of a ceiling will be angled upwards. Do it. Look upward from your screen. Then, scanning along the pinnacle of the wall to a point right in front of y'all, that edge will be level. Moving further, the corner will be at a downward angle.
Really that'southward all an equirectangular projection is doing. It'southward irresolute the orientation of things to appear as they practice when you turn your head to scan the room.
The method beneath helps united states draw these curves properly.
Step 1 – Become setup
Choice a location with plenty of rectangular shapes and lines.
Get your cartoon materials: pencil, eraser, easel, and paper.
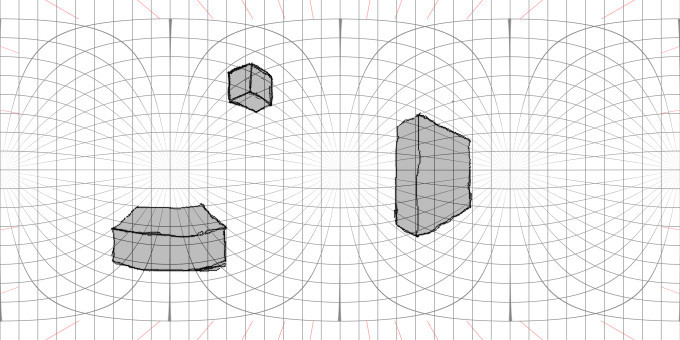
Download and print a version of this equirectangular perspective grid. Legal size paper (viii.5″×fourteen″) is a great size for this purpose.

I have two ways of superimposing (subimposing?) this grid onto paper. The first one is straightforward. Use tracing newspaper and tape or pin information technology down on acme of the grid. The 2nd is to print the grid onto the back of the paper you're cartoon on. And then, when you're drawing, make sure the newspaper is on a calorie-free surface so that the black lines on the back of the paper show through.
Step ii – Locate your environs onto the grid
Align yourself with your surroundings. Selection a wall or a building to be forward and face it squarely. Now yous can acquaintance six main real-life directions with these locations on your filigree:
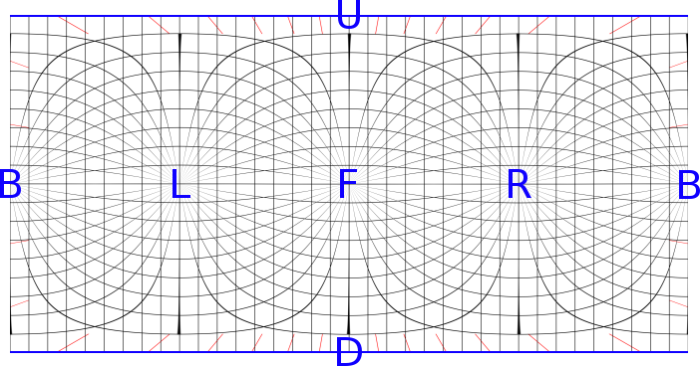
The sets of lines emanating from each of these directions are spaced 10° apart. One set of lines go from straight forward to directly back, one goes from left to right and the third ready get up and down.

Your task now, is to figure out where each item in your environment belongs on the grid newspaper. You lot need to measure ii angles. The first is the horizontal bending between straight forrard and your object: theazimuth. The second is the vertical angle betwixt your object and the horizon: thealtitude.
Azimuth
 If you're lazy and don't care too much about accurateness like me, you can follow the astronomers' tricks described here to measure angles from the known points in your scene.
Another method uses the cherry marks that I placed the edge of the perspective graph paper. With your newspaper level, each red tick mark will signal the direction from the heart of the newspaper out towards your environment in 10° increments.
A third mode is to utilize a compass app on your smartphone. You'll accept to practise a fiddling math. For instance, if your compass says 97° when facing forward and it says 128° when facing an object and so the object has an azimuth of 128° – 97° = 31°.
Distance
To mensurate upwards (or downwards) from the horizon, imagine the horizon line and then apply those astronomer tricks once again.
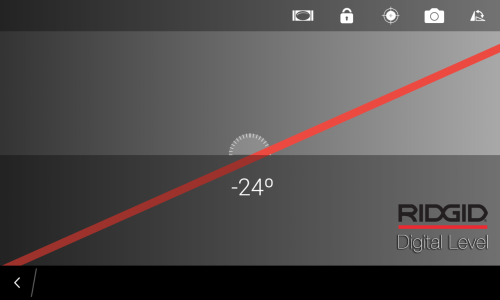
For a more mechanical method, what you desire is a clinometer. Look online for how to make i yourself – you can even buy them gear up made.
And of grade your smartphone can do this too. Many level apps accept a clinometer style. Just look along the long edge of your telephone like a sight.
At this point, it's expert to mention that information technology's upward to you lot to make up one's mind how independent you wish to exist from technology. If y'all go too far, you might as well just trace a picture show taken by a spherical camera. On the other side of the spectrum you can merely forgo the grid and wing the whole thing. What I do, is I keep the grid newspaper, only I practise without the smart phone apps.
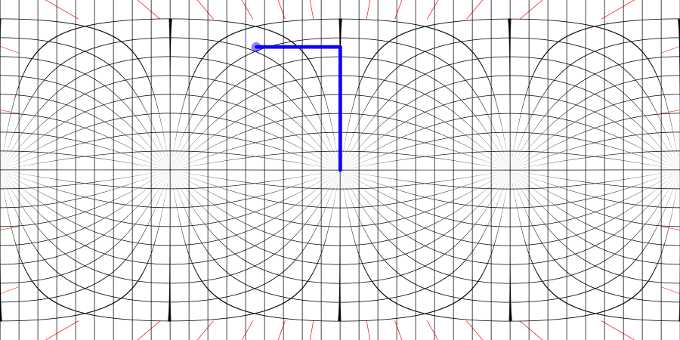
Locate your point on the grid
So, now that you have the distance and azimuth of a point in space, you can observe where it is on your grid. You'll want to locate the altitude first. Here'southward an instance. Say your altitude is 65° and your azimuth is -45°. Starting at frontwards, go half-dozen½ lines up, and and so four½ lines to the left.
Stride 3 – Describe!
Depict the straight lines of your scene in the aforementioned manner as a 2-point perspective drawing. That is, if the line in the scene is plumb, draw the line vertically. If the line is frontward / backwards, follow the direction of the lines that get between the forwards / backwards vanishing points. If your line in the scene goes left to right, follow the lines that get between the left / right vanishing points.
I like to start straight forwards and build outwards.
You may rely on previous line placements. Say y'all've drawn i corner of a rectangle, follow the edge along the graph-paper lines to go to the next corner.
It might help to embrace imperfections. If lines aren't coming together up where they should be, look for compromises.
In an equirectangular projection, the top and bottom become extremely distorted. So drawing your chair might be difficult. More frequently then non however, the space directly above you (the zenith) and the space below you (the nadir) are rather featureless.
Do more! This method will layout your scene but for heaven's sake, if you lot have a favourite medium (pen and ink, paint, digital painting, woodcut printing, watercolor, etc.), then past all means use it.
Pace iv – Scan, upload and share
Mark the corners of the sketch. They'll be useful when you crop and align your scanned picture.
If you have grid printed on the back of your newspaper, browse or photograph your drawing with a nighttime paper behind it. The grid will disappear, and only your drawing will stand out. Only if you used tracing paper, put a white paper behind it.
Once you've scanned your pic, photo editing software can help you straighten, ingather and calibration it to lucifer the 2:1 aspect ratio.
You tin can share it equally is. Simply to get the immersive view on Flickr, tag your image with the tag 'equirectangular'. For Facebook, things are a lot trickier. You have to ready the prototype's metadata before uploading it.
Personally, I like to transform spherical panoramas using interesting mathematical mappings. This gives me a chance to 'compose' the epitome into something dynamic. Stereographic images normally turn out very nicely.

Source: https://dmswart.com/2016/06/28/drawing-a-panorama/
Posted by: andersondadogiag.blogspot.com
0 Response to "How To Make A Drawing Panoramic"
Post a Comment